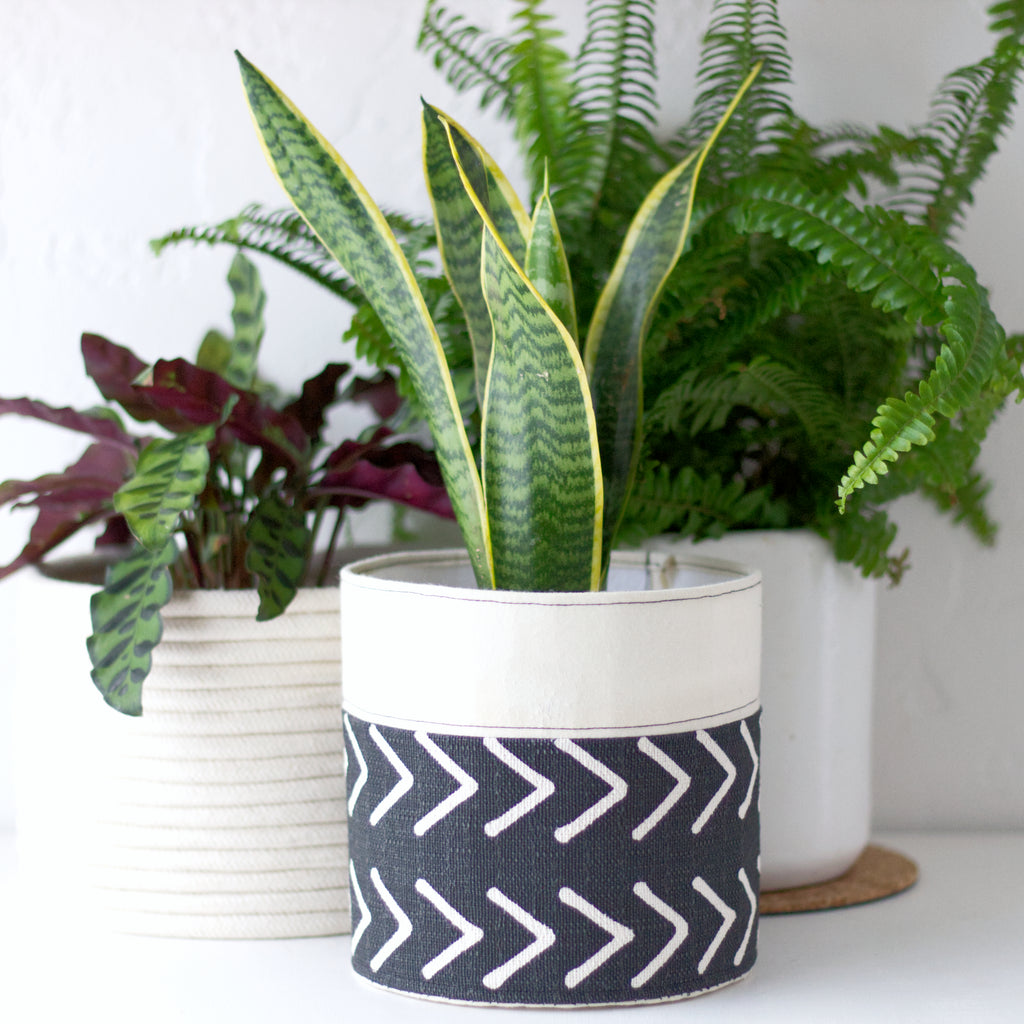
How To Make A DIY Fabric Plant Holder


I don't know about you--but one trend I absolutely fell into last year was that of renovating my home space. With spending so much time at home (i.e. basically all the time) at some point I really started to feel suffocated. And that if I didn't update said space I was potentially going to go a little insane. Enter: Houseplants.
Maybe 5-6 months into the pandemic, my husband and I decided to really dive into the world of becoming houseplant parents. We have always had a few plants here and there spread throughout the house--but we really wanted the house to become a full on jungle. (We may have bought 21 plants for our living room in the space of a few weeks--yah..)
We've got a pretty wide variety of houseplants--with requirements being that they are all low maintenance and have the ability to survive on relatively low light. Our plants range from Monsteras to Snake Plants to a wide variety of Pothos.

And if you yourself are a plant parent, then you know that it isn't exactly an inexpensive endeavor to invest in. Plants aren't cheap and pots aren't cheap. Which is exactly where we come in with this DIY fabric plant holder: All you need to make it is fabric, thread, and a stiff, sew-in stabilizer. Really--that's it!
Btw--this is the third post in our new DIY home sewing series. If you are getting real serious about updating your home space in cheap, easy ways--then make sure to check out the additional posts! We've covered how to make a DIY pet bed as well as how to sew easy curtains. All three of these DIY tutorials truly are easy ways to completely transform your space.
But, for now. Let's learn how to make a DIY fabric plant holder!
(This post on how to make a fabric plant holder is part of our DIY home project series--a full guide with all of the tutorials is coming soon! Get on the list now and be the first to receive the guide straight to your inbox.)

What you need to make a DIY fabric plant holder: Materials

As I mentioned above--there really isn't much that goes into our DIY fabric plant holder. You may even already have all of the materials at home! Here's what you'll need to pull out:
- Fabric: I chose two contrasting fabrics for mine--just to help make my plant holder a little more interesting. The amount of fabric you will need depends on the plant/pot you will be placing in the holder. I used a midweight canvas-like mud cloth and basic muslin for my plant holder.
- Thread: Just your basic thread. Match it or contrast it, you choose!
- Sew-In Stabilizer: An ultra thick stabilizer that will keep that beautiful, strong, round shape of the plant holder. The amount you will need also depends on the plant/pot you will be placing in the holder.
- Houseplant: Grab the houseplant that you want to put inside the plant holder. It should already be potted and in its forever (for now) pot!
And really.. That's it! Now let's move on to the tools.
(This post on how to make a fabric plant holder is part of our DIY home project series--a full guide with all of the tutorials is coming soon! Get on the list now and be the first to receive the guide straight to your inbox.)
What you need to make a DIY fabric plant holder: Tools

Thankfully, you really only need the most basic of tools for this sewing project. (Those are the best projects, am I right?) Here's what you'll need to pull out of your sewing kit:
- Ruler
- Sewing pins
- Fabric scissors
- Measuring tape
- Hand sewing needle
- Sewing machine
And again.. That's it! So. Ready to learn how to make your very own DIY fabric plant holder? Let's get started!
(This post on how to make a fabric plant holder is part of our DIY home project series--a full guide with all of the tutorials is coming soon! Get on the list now and be the first to receive the guide straight to your inbox.)
How to make a DIY fabric plant holder: Step 1


To start, you'll need to grab your houseplant. As I mentioned above, the plant should already be planted in its pot that will be going inside of the plant holder.
Start by measuring the height of the plant pot. I would recommend adding 1"-1.5" higher than the top of the pot. Take note of the measurement.
Repeat the process by measuring around the widest part of the pot--in the case of my plant, the widest part was around the top of the pot. I would recommend adding at least an inch to this measurement as well, to give the pot a little room to breath. Take note of the measurement.
For reference, the measurements for my plant holder are as follows: 6" x 20".
(This post on how to make a fabric plant holder is part of our DIY home project series--a full guide with all of the tutorials is coming soon! Get on the list now and be the first to receive the guide straight to your inbox.)
How to make a DIY fabric plant holder: Step 2

Next, it's time to cut out the panels of the plant holder. For ours, I decided to use two contrasting bands, just for decorative purposes. I also think it helps to hold in the stabilizer--but if you want, you could always do a solid panel rather than the two contrasting bands.
To start, cut out the top band of the plant holder--the measurement should be 1/3" of the overall height measurement. For our purposes, that would be 2" x 20". Add in seam allowances to make the final cutting measurement 3" x 21". I drew the band directly onto my muslin fabric (using a ruler) and then cut it out accordingly.
Next, cut out the lower band of the plant holder. For my plant holder, the measurement was 4" x 20". With seam allowances added, the final cutting measurement came out to 5" x 21". Again, I just drew the panel onto the back side of the fabric (using a ruler) and cut it out accordingly.
And finally, cut out the stabilizer. Do this in one big piece, rather than two separate panels. For our purposes, the measurement for the stabilizer was 6" x 20"--basically the overall finished height and width of the fabric plant holder. Again, just draw the measurements directly onto the stabilizer and cut it out.
How to make a DIY fabric plant holder: Step 3

With the three pieces that make up the side panels of the plant holder cut out, it's time to start assembling!
Pin the upper band of the plant holder to the lower band, right side to right side. Stitch accordingly, making sure to follow your seam allowance accordingly.
(This post on how to make a fabric plant holder is part of our DIY home project series--a full guide with all of the tutorials is coming soon! Get on the list now and be the first to receive the guide straight to your inbox.)
How to make a DIY fabric plant holder: Step 4

With the top band attached to the lower band, press the seam open. If needed, press the upper and lower bands flat as well.
How to make a DIY fabric plant holder: Step 5

Next, grab the stabilizer and pin it to the upper and lower bands, making sure to keep the seam allowance from steps 3 & 4 pressed open. (You don't need to pin like crazy--just in a few spots to keep it secure.) There should be a 1/2" seam allowance gap around all sides of the stabilizer.
Topstitch the stabilizer to the upper band of the plant holder, staying close to the stitch line. Make sure to use a slightly larger stitch for a more decorative look. (And also since the stabilizer is pretty thick!) Unpin the stabilizer, it should now be secure.
(This post on how to make a fabric plant holder is part of our DIY home project series--a full guide with all of the tutorials is coming soon! Get on the list now and be the first to receive the guide straight to your inbox.)
How to make a DIY fabric plant holder: Step 6

Next, fold over the seam allowance on the upper band and pin to the stabilizer. Fold the seam allowance under, to create a folded hem. Pin and then topstitch closed the length of the band.
NOTE: The folded hem should be on the inside, the wrong side of the plant holder. Not the outside, the side you see!
How to make a DIY fabric plant holder: Step 7

Repeat the process for the bottom of the lower band: Fold over the seam allowance, pin to the stabilizer, then fold the seam allowance under to create a folded hem.
Again, pin and then topstitch the length of the band.
(This post on how to make a fabric plant holder is part of our DIY home project series--a full guide with all of the tutorials is coming soon! Get on the list now and be the first to receive the guide straight to your inbox.)
How to make a DIY fabric plant holder: Step 8


With the top and bottom stitched closed, it's time to close up the sides of the plant holder.
Pin the sides of the bands together (right side to right side) making sure to take care to match the seam lines that connect the upper and lower bands. I would recommend stitching this line first, then closing up the remaining seam from there. (Nobody likes uneven matching stitch lines.)
And at this point, you should have the round plant holder!
How to make a DIY fabric plant holder: Step 9

Now it's time to create the bottom of the plant holder. There are two pieces that make up the bottom: A circle cut in your self (or contrasting) fabric, as well as a circle cut in the stabilizer fabric.
To start, I would recommend placing the houseplant inside the round shell that you just finished sewing. Then place that onto some spare fabric and draw a circle around the base of the plant holder. Remove the plant and even out the circle, if needed.
Take that circle and cut the same shape out in the stabilizer fabric. Next, pin the stabilizer to the fabric you want to use for the bottom of the plant holder. (I used muslin, but you could also use your lower band fabric--the choice is yours!) Add 1/2" seam allowances all around the stabilizer circle, drawing directly onto the fabric, and cut!
(This post on how to make a fabric plant holder is part of our DIY home project series--a full guide with all of the tutorials is coming soon! Get on the list now and be the first to receive the guide straight to your inbox.)
How to make a DIY fabric plant holder: Step 10


With the two bottoms of the plant holder cut out, it's time to get them sewn up. Pin the center of the stabilizer to the wrong side of the bottom circle of the plant holder.
This next part is slightly time consuming: While pinning the seam allowance of the bottom circle to the stabilizer, you will need to snip triangles as you pin. This allows you to sew the circle effectively and cleanly. Snip 2-3 triangles at a time, about 1/8" apart, then pin the remaining seam allowance to the stabilizer.
With the bottom circle attached to the stabilizer, slowly topstitch the two pieces together, close to the edge of the circle.
How to make a DIY fabric plant holder: Step 11


Now it's time to pull out that hand sewing needle and thread! To start, pin the bottom of the plant holder to the round sides. This can be a little tricky--Push the pins through the bottom, an inch apart, then though the round cylinder of the plant holder.
Starting at the back seam, backstitch your needle and thread, then securely attach the bottom of the plant holder to the sides using the slip stitch. Move diagonally up and to the left, pick a small stitch in the bottom of the plant holder, then diagonally back down to the side of the plant holder. Pick another small stitch to the left, then move back up to the bottom, and repeat. (Want a more detailed sewing tutorial on how to sew the slip stitch? Check out our hand sewing guide, which will walk you through it, step-by-step.)
Make your way around, hand stitching the bottom to the side of the plant holder--then once you reach the other side and backstitch your thread, you will have a completed DIY fabric plant holder!
(This post on how to make a fabric plant holder is part of our DIY home project series--a full guide with all of the tutorials is coming soon! Get on the list now and be the first to receive the guide straight to your inbox.)
So. Ready to make your own DIY plant holder?

I love this DIY sewing tutorial because it really is a pretty simple one. Easy materials (most of which you should already have at home, and you can easily order the stabilizer off of Amazon), simple sewing, and it can be completed from start to finish in just a few hours. #yesplease
Also, a major bonus: A DIY fabric planter is much cheaper than buying a pot for your houseplant. (Those things are just crazy expensive, am I right? Usually even more expensive than the plant itself.)
In previous DIY home posts, one of the benefits I really emphasized when DIY'ing your home space is that not only are textiles an incredibly cheap way to update your space.. But they are also so personal, and can be completely individualized. I also really love that I can use coordinating fabric for my projects: The mud cloth-like fabric I used for my plant holders is the same fabric I used for my sweet pup's new bed.
So. Whether you're looking for a cheap alternative when it comes to housing your plant babies, or you're looking to create a more consistent, comfy home space (maybe just by giving it a bit of a facelift?) I hope that you will find this DIY tutorial useful. And stay tuned, more DIY home projects are coming soon--let me know below if there are any projects you have been wanting to learn how to make!
(This post on how to make a fabric plant holder is part of our DIY home project series--a full guide with all of the tutorials is coming soon! Get on the list now and be the first to receive the guide straight to your inbox.)


![]()
![]()
![]()