How To Bring A Vintage Sewing Pattern To Life: Part One

Ohmygoodness I am real excited for this week's post--the official introduction to our new vintage sewing pattern series! This post has been a long time coming--after receiving a box of gorgeous vintage sewing patterns from an old friend back in April/May of last year. And then you guys voting on which pattern I should make in June.. Alas, the time is finally here!
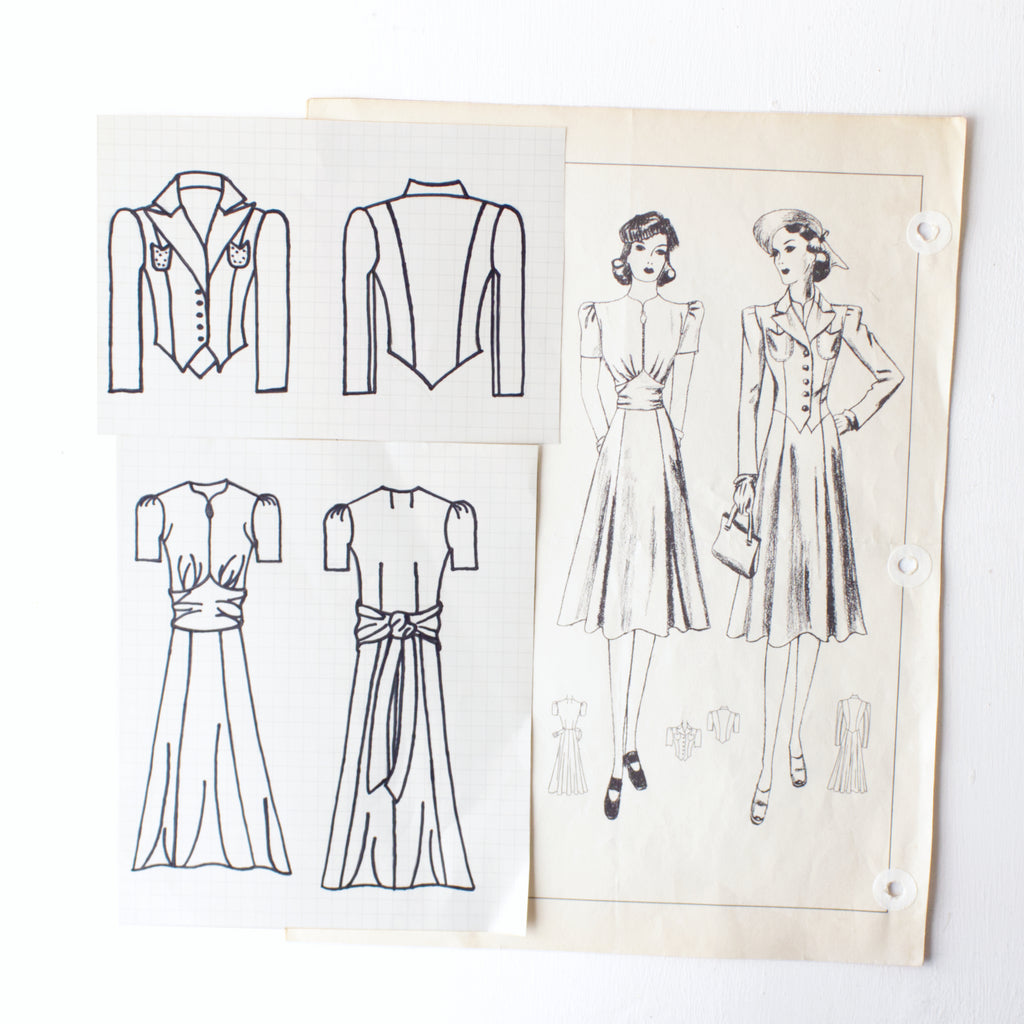
But first, let's back up. The pattern design you guys picked came from a massive box of vintage sewing patterns that an old friend from New York sent me. Her mother had attended FIT back in the 1930's & 40's, and she kept all of her schoolwork: Her hand drawn illustrations of 1940's fashion, her notes on how to make certain garments--everything.
So when I received that box of beautiful patterns.. I knew I had to make some of them. I have also really been itching to dive into the world of costume design, and I feel like these vintage patterns truly are the perfect opportunity. Some of the designs look like they are straight out of the movies.
If you want to take a look at some of the other beautiful vintage designs that I pulled from my box of treasures, make sure to check out our post on vintage sewing pattern inspiration. I picked out a few of my favs and went into detail about what makes them so unique and gorgeous--including the design that we will be moving forward with in this series!
(Looking to sew your own vintage sewing pattern? Well girl, you'll need a sewing kit first. Learn how to build your very own sewing kit with our downloadable step-by-step guide and you'll be sewing in no time!)

The vintage sewing pattern series

So, what is this new series going to be about? Basically, I'm going to walk you through how I am creating this vintage design, step-by-step. The only guidance that I have for creating the design is one piece of paper. It has two different illustrations--one of the dress, and one of the jacket being worn with the dress. There are two small technical illustrations, as well as a few notes for drafting.. But really, it's not much to go on.
Which is why I figured this would be the perfect opportunity for a new series. Maybe you are in a similar situation--you have an illustration of a beautiful design, sitting in the closest that you've been wanting to recreate for years. Or maybe you just love vintage fashion and seeing those designs given a new life. Whatever the reasoning is--I hope you will love this new series!
This first post is going to walk you through my initial planning steps for prepping the vintage sewing pattern. I imagine future posts to include the following:
- The initial sample fitting: What went wrong, what went right, the difficulties with drafting a design (that isn't your own) from absolute scratch.
- Construction detail sewing tutorials: I would also love to pull a few new sewing tutorials from this project.
- Additional sample fittings & final construction: Any final sample issues as well as any challenges or lessons learned cutting & sewing with unique, more costume-like fabrics.
This will definitely be a long term project--one that I hope you are going to love!
(Looking to sew your own vintage sewing pattern? Well girl, you'll need a sewing kit first. Learn how to build your very own sewing kit with our downloadable step-by-step guide and you'll be sewing in no time!)
The vintage sewing pattern project

So. What is the project exactly? Well technically, it's two different designs:
- The dress: This beauty is midi length with a fitted waist and a flared seven-piece circular skirt. The top of the dress has a beautiful, curved neckline that flows into a center front zipper closure. Delicately puffed sleeves compliment the shirring along the waistline. And of course--inseam side pockets will be included in the skirt of the dress. (Because who wants to wear a dress without pockets?)
- The jacket: This semi-fitted jacket compliments the dress perfectly. The pointed hemlines front and back echo the same curves along the waistline of the dress, and princess seams in the jacket perfectly match the seven-piece panels of the skirt of the dress. The jacket is then complete with a notched collar, two-piece sleeves, and center front buttons.
So, like I said--long term project.
(Looking to sew your own vintage sewing pattern? Well girl, you'll need a sewing kit first. Learn how to build your very own sewing kit with our downloadable step-by-step guide and you'll be sewing in no time!)
How to bring a vintage sewing pattern to life: First steps

So. Where to begin when the overwhelm starts to set in? (Because yes--just typing that all out started to slightly overwhelm me.) As I mentioned above--all I have when it comes to recreating this vintage sewing pattern is a single page. And while that may seem a little scary, try flipping that mindset around. While yes, you may have very little direction.. That means you can go any direction you want to.
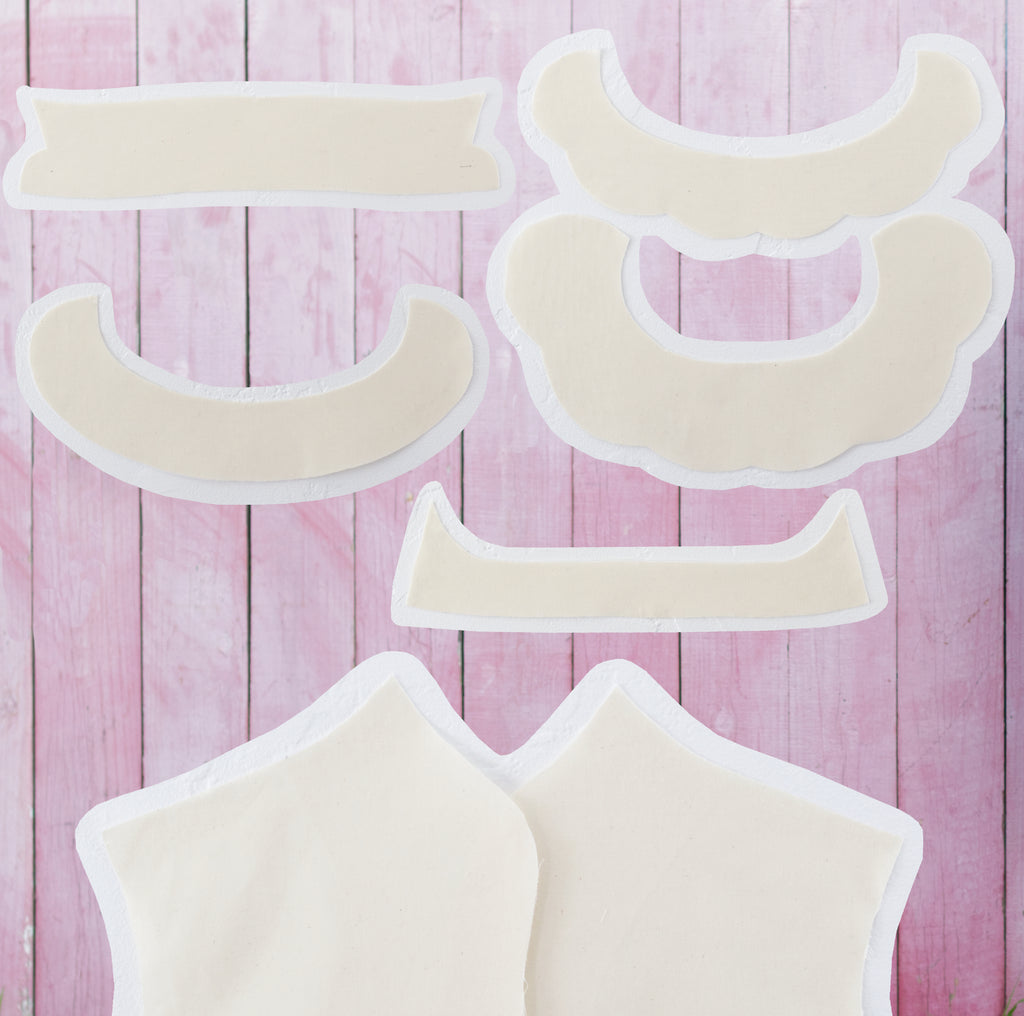
Where I decided to start was with drawing a more technical sketch first. A technical sketch is exactly what it sounds like--a more detailed line drawing that focuses on the construction of the garment, rather than the design aspects. You really want to try to deconstruct the garment in your mind:

Once you have the technical drawing laid out, deconstruct the design even further. Draw out every single pattern piece needed: The left front bodice, the right front bodice, the left sleeve, right sleeve, etc. etc. With all of the self pattern pieces drawn out, repeat the process with the lining pieces. (If your design isn't lined, then don't worry about that!) And finally, draw out all of the pieces that need to be interfaced: The necklines, waist ties, pocket facings, etc.
(Looking to sew your own vintage sewing pattern? Well girl, you'll need a sewing kit first. Learn how to build your very own sewing kit with our downloadable step-by-step guide and you'll be sewing in no time!)

With every. single. pattern piece drawn out, number them accordingly. (i.e. The left front bodice is pattern piece #1, the right front bodice is pattern piece #2, etc.) Create a comprehensive list that includes all of the different pattern pieces and their respective numbers. Not only does this give you a sort of inventory of all the pattern pieces that need to be created, but it also gives you an idea of what needs to be created.
Not sure how to draft that sleeve? How to create a seven-piece skirt? Well now you know what to look up when you pull out that pattern drafting book, what sewing patterns you need to buy (if not making your own), which sewing tutorials you might need to look up prior to sewing your first sample.
This first step is literally just prep work--and I promise you will thank yourself once it's done. Put in the few hours it takes to really deconstruct a design, organize your work, and really just prepare yourself for the project ahead. I have found time and time again that when I mentally prep myself for an upcoming project, I always, always end up with better results.
(Looking to sew your own vintage sewing pattern? Well girl, you'll need a sewing kit first. Learn how to build your very own sewing kit with our downloadable step-by-step guide and you'll be sewing in no time!)
Stay tuned! More on the vintage sewing pattern series coming soon

So, what's next? Now that I have my handy dandy list of all of the pattern pieces I need to create, I am going to start with drafting the dress. I will start by doing initial drafts for all of the pieces, then tweaking as need be: Slashing and spreading the seven-piece skirt and the puff sleeves, adjusting the dart intake, etc.
So the next post you will see in this series is going to be all about the first muslin sample of the dress. What went into it, what went right, and what went wrong. I intend on doing the full lining and fusible for the sample--to really make sure that this vintage sewing pattern is done right.

While I have done relatively small projects over the years, I really, really want this one to stand out. Once I've got the dress on my mannequin, I will start looking into fabrics.. Which might be a bit of a challenge, in a COVID pandemic world. I've been lucky with the fabrics I have been buying on Etsy though.. So fingers crossed!
Are there any particular lessons that you would love to learn in this series? Or any questions that you might have about drafting a vintage design from scratch? Let me know below!
(Looking to sew your own vintage sewing pattern? Well girl, you'll need a sewing kit first. Learn how to build your very own sewing kit with our downloadable step-by-step guide and you'll be sewing in no time!)


![]()
![]()
![]()