Let's Talk Construction Details: Collars, Part One


I am real, real excited to introduce you to a brand new series here at TFM: The one I am oh-so-cleverly calling our construction detail series. Which is all about.. construction details, oh yah!
Over the years, with each new sewing project, I have covered how to sew a different construction detail involved in said project. We've covered how to sew double welt pockets, chevron pleats, a button & buttonhole, etc. etc. This series is different in that I will be drafting 5 different designs for a specific construction detail (i.e. collars, sleeves, pockets, etc.) and then you will vote on your fav--from which I will then put together a full and complete sewing tutorial for that particular design detail.
A main purpose of this series is to explore construction details I normally wouldn't sew up in a project that I myself would want to wear. But it may be something that you love and have really been itching to sew. And who knows--after sewing up a sample, maybe I will fall in love too! It's happened before, where I see a detail on a muslin and end up loving it when I normally wouldn't have thought twice about it.

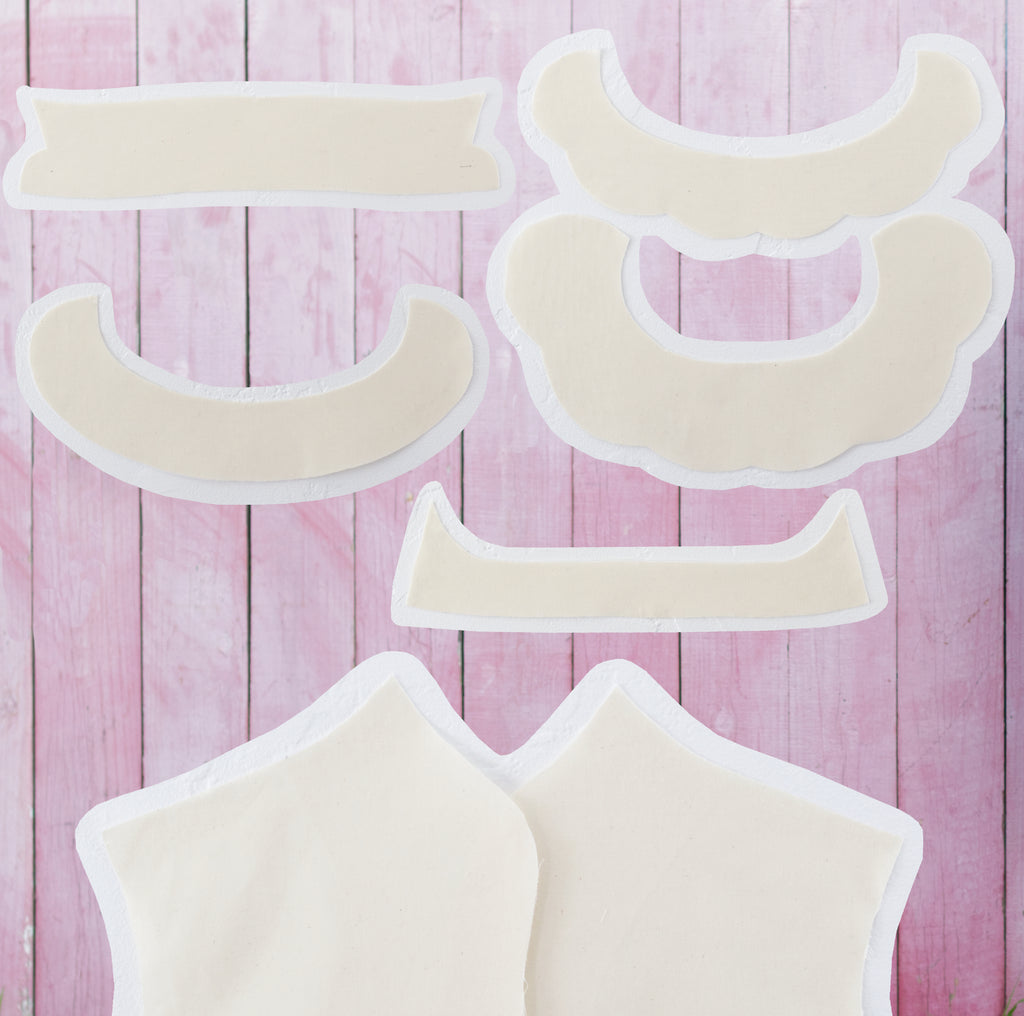
I have drafted and put together a sewing tutorial for only one collar over the years--the basic shirt collar. And while yes, it's definitely one of the most practical collars out there, there truly are SO many more unique ones you can choose to sew up in a project. Here are the collars we will be covering in this first post of the series:
- The Peter Pan collar: An absolute classic, truly.
- The scalloped Peter Pan collar: A sweet twist on the classic, with two layered, beautifully scalloped collars.
- The all-in-one shirt collar: A more elegant, seamless version of the basic shirt collar.
- The wing-tipped Mandarin collar: A twist on the basic Mandarin collar, with unique little wing tips that fold down.
- The built-up neckline: Is it a collar, or not a collar? The most elegant neckline I have ever seen, truly.
So. This initial post of the series will walk you through each of the collar samples I drafted up--then make sure to vote for your favorite in the comments below!
(Before you can start sewing up collars, you'll need to build yourself a sewing kit. Then stay tuned--once you're on the list, you'll automatically be sent the step-by-step sewing tutorial for whichever construction detail you vote for!)

Construction details: The Peter Pan collar

Oh the Peter Pan collar--it truly is one of the most classic collars out there, and I guarantee you've got at least a few of them in your closet right now! The collar itself is pretty basic: The round shape of it essentially hugs the neckline, with a sweet little round curve that flows up to the center front neckline.
There are three different methods in which to draft a Peter Pan collar, depending on how you'd like it to fall on the neckline:
- The full roll: A collar that stands up from the neckline and slopes downward.
- The partial roll: A collar with a slight stand, yet is flatter than that of the full roll.
- The flat roll: A collar that lays flat against the neckline and shoulders.
I just drafted a basic flat roll for this collar, since I really just wanted to recreate that classic look. These types of flat collars work well on blouses and dresses of all types--they can be used to sweeten us a more basic design, or they can be embroidered to create a really beautiful, unique effect. Looking for a slightly more dressed up Peter Pan collar? Well keep reading..
(Before you can start sewing up collars, you'll need to build yourself a sewing kit. Then stay tuned--once you're on the list, you'll automatically be sent the step-by-step sewing tutorial for whichever construction detail you vote for!)
Construction details: The scalloped Peter Pan collar

Remember how I mentioned above that one of the purposes of this series is to draft construction details I would normally never wear myself? Well, the scalloped Peter Pan collar is a perfect example of that--I have never worn one in my life, but after drafting and sewing it up, I'm actually kind of in love with it.
This scalloped beauty was drafted from the basic Peter Pan--the upper scalloped collar is a basic flat roll and the lower collar is a partial roll collar to help hold up the two stacked collars. I drew the stylized scallop lines directly onto the collars, ensuring that the lower collar was wider than the upper.
My scallop lines on the collars aren't perfect--when I initially drafted them, I didn't draw the scallops deep enough--so I ended up having to redraw them directly onto the fabric collars once they were already initially sewn up. Which, as can be expected when drawing freehand, didn't result in perfectly proportioned scallops. So if this ends up being the design you guys pick, I will definitely need to redraft the scallop lines to get them a bit more even.
Overall--I think this is the collar that surprised me the most with how much I ended up liking it. It's sweet, unique, and could be just gorgeous when paired with the right design in the perfect fabric.
(Before you can start sewing up collars, you'll need to build yourself a sewing kit. Then stay tuned--once you're on the list, you'll automatically be sent the step-by-step sewing tutorial for whichever construction detail you vote for!)
Construction details: The all-in-one shirt collar


This collar is fairly similar to the basic shirt collar we covered when sewing up the Mauve Shirt Dress.. but for some reason I love the all-in-one so much more. The basic shirt collar has a handful of pieces: The upper collar, the lower collar, and two collar stands--not including interfacing.
But the all-in-one collar is--you got it--just one piece. The collar stand and the collar itself are combined into one, and just flow seamlessly into one another. I had never actually sewn an all-in-one collar prior to this post, and I don't think I will ever be going back to drafting and sewing shirt collars with stands.
Not only is this collar easier to sew than a basic shirt collar with a stand--but I also feel like it falls differently. To me, it falls softer and isn't nearly as stiff as a collar with a stand. #yesplease
(Before you can start sewing up collars, you'll need to build yourself a sewing kit. Then stay tuned--once you're on the list, you'll automatically be sent the step-by-step sewing tutorial for whichever construction detail you vote for!)
Construction details: The wing-tipped Mandarin collar

I was originally just going to draft up a basic Mandarin collar for this post--but then I saw this wing-tipped design alternative in my pattern drafting book and just knew I wanted to sew it up. The collar itself really is just a basic Mandarin--the only difference being that some sweet little tips were added to either side of the collar at center front.
While technically the wing tips could stand up straight like the traditional Mandarin--they're meant to be pressed and folded down to create that unique wing-tipped look. This design actually surprised me--I thought I was going to love it and that it was going to be my absolute favorite--but it ended up being one of my least favorites. I wasn't 100% precise with my seam allowances and collar tips--which resulted in the tips being slightly different sizes. And when paired right next to one another, it's pretty obvious when they aren't the same size.
So. If sewing up your own wing-tipped Mandarin collar--tracking your seam allowance and pushing out those tips so that they are the exact same size truly is essential. And if you guys pick this collar then I will most certainly be keeping that in mind!
(Before you can start sewing up collars, you'll need to build yourself a sewing kit. Then stay tuned--once you're on the list, you'll automatically be sent the step-by-step sewing tutorial for whichever construction detail you vote for!)
Construction details: The built-up neckline


Now, I feel like some of you may be thinking--this isn't a collar. BUT it was in the collars section of my pattern drafting book, and it provides the same purpose as a collar--protecting and dressing up the neckline--so I'm including it. And I think it's gorgeous and beautiful and I want to add it to everything.
This collar is unique in that there aren't any seam lines. All of the previous collars in this post are attached to the neckline with a seam--this collar is simply built and drafted into the neckline of the garment.
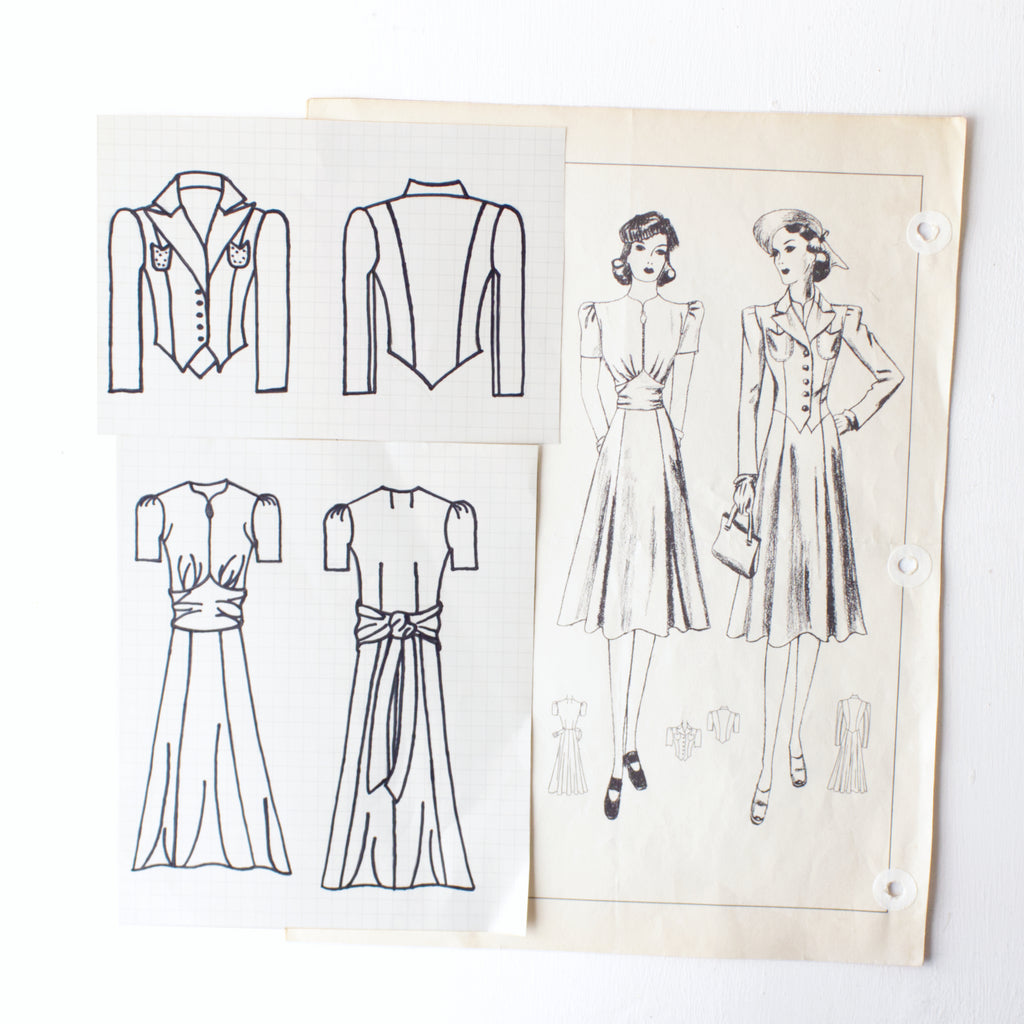
I was actually initially drawn to this neckline because it looks pretty similar to that of the vintage dress we will be drafting here soon. (Check out the original post on the full vintage sewing pattern we will be bringing to life--all I have is a sketch from the 1940's and oooh I am so excited to get started on it!)
I feel like this collar will really only work for a limited range of projects and fabrics--but my goodness, if you get the combo of design and fabric right.. It could very well be the most beautiful collar/neckline you've ever sewn in your life. Am I right?
(Before you can start sewing up collars, you'll need to build yourself a sewing kit. Then stay tuned--once you're on the list, you'll automatically be sent the step-by-step sewing tutorial for whichever construction detail you vote for!)
Which is your favorite collar?

So! I feel like I covered a fairly wide range of collars with this post--we've got your basic collar, an intricate and fancy collar, your shirt collar, a unique and edgy collar, and a beautifully elegant collar. Which is your favorite? Which do you want to see a full sewing tutorial for?
Not only do I intend on putting together a complete sewing tutorial for the collar that you guys pick--but if the design works well, I think I might just add the collar as a design option for our original sewing pattern, the Dany. While I absolutely love the bare neckline on the Dany, I think it could be fun to add a sweet collar to it--what do you think?
So, if you can spare a moment--comment below with your favorite collar! Also make sure to check us out on Instagram--I will be posting the vote there as well, and will announce the winner once the votes are all tallied up. I can't wait to see what you guys pick!
(Before you can start sewing up collars, you'll need to build yourself a sewing kit. Then stay tuned--once you're on the list, you'll automatically be sent the step-by-step sewing tutorial for whichever construction detail you vote for!)


![]()
![]()
![]()


Julia Russ — March 16 2021
Trudy — I love it too! I think I am going to use that one for our vintage sewing pattern series.. it’s gorgeous!
Trudy Keyser — March 16 2021
I like #5 the built up collar. It’s elegant and classy.