How To Sew Spaghetti Straps: The Naoko Tank Sewing Tutorial


So. You've checked out this month's sewing project, the Naoko Tank. And you love, love, love it. Am I right? And now you're probably thinking: "I wonder what's going to be this month's sewing tutorial?" I'm so glad you asked! This month, we are learning how to sew spaghetti straps. Because really--Who doesn't love spaghetti straps?
Not only are tanks year round currency here in San Diego, but they are also so. incredibly. comfortable. Even if you live in cold as NYC, you're going to have some tanks with spaghetti straps in your closet. The sun always comes out eventually! (Although it's almost always out here in San Diego. So.)
I mentioned in our previous post on the Naoko Tank how I have always struggled with spaghetti straps, and I have no idea why. They really aren't all that complicated. When I was at FIDM, I would literally have my husband making my spaghetti straps for me, because I would get so frustrated with them.
Here we have a man with little to no sewing education, and he's perfectly content with making spaghetti straps. And then you have me, with an extensive sewing education and background, who couldn't make a spaghetti strap if my life depended on it.

No, but really, it wasn't funny. It was incredibly frustrating.
I would always get caught up with that little looping tool that would turn the spaghetti straps inside out. (No idea what I'm talking about? Keep reading!) I literally could just NEVER get it to work..
And Paul could do it in like 35 seconds. So irritating.


So I just had him make all of my straps while I was in school. But NOW. With the Naoko Tank, I really wanted to tackle those goddamn spaghetti straps. I wanted to figure it out, once and for all. To make my own strap, without the help of my husband.
And I think I have FINALLY figured it out, and where I went wrong back in school. With this sewing tutorial, I am going to cover two different methods on how to sew spaghetti straps.
One method has a clean finish on the strap, while the second method has a topstitched finish on it. Both options can work for a tank (or anything really) it just depends on what look you are going for.
And keep in mind: This sewing tutorial can be used for ANY sewing project involving spaghetti straps. You don't have to be making a tank like the Naoko to use it. (Think: Summer dress! Because Summer is coming.)
(Ready to learn how to sew spaghetti straps? Grab your free, printable worksheet tutorial below. The perfect sewing companion!) 
The Naoko Tank sewing tutorial: Method 1
The first method on how to sew spaghetti straps is the method I struggled with while at FIDM. The finished strap is clean, with no topstitching.


You will need a tool for this method, and it's called a loop turner. It's essentially just a long, thin, metal stick with a circle at one end and a little hook on the other end. I literally hate this tool, it is the bane of my sewing existence.
The little hook on the end of the loop turner essentially just hooks on to your spaghetti strap, allowing you to turn it inside out. Not a complicated concept.. But a bit more difficult to replicate in practice.
Anyways.. Let's get started!
How to sew spaghetti straps sewing tutorial: Step 1 (method 1)
To start this sewing tutorial, you should already have your spaghetti strap cut out and ready to go.
I think it's pretty normal for spaghetti straps to range from 1/4"-1/2" in width, but the choice is totally up to you. I used a 1/4" wide strap for the Naoko Tank. (Not including seam allowances. I also added 1/4" to each side, just to be safe. We can trim the excess later.)
The length of the strap depends on your particular body type, as well as the design that you are working with.

To start, press the spaghetti strap, right side to right side.
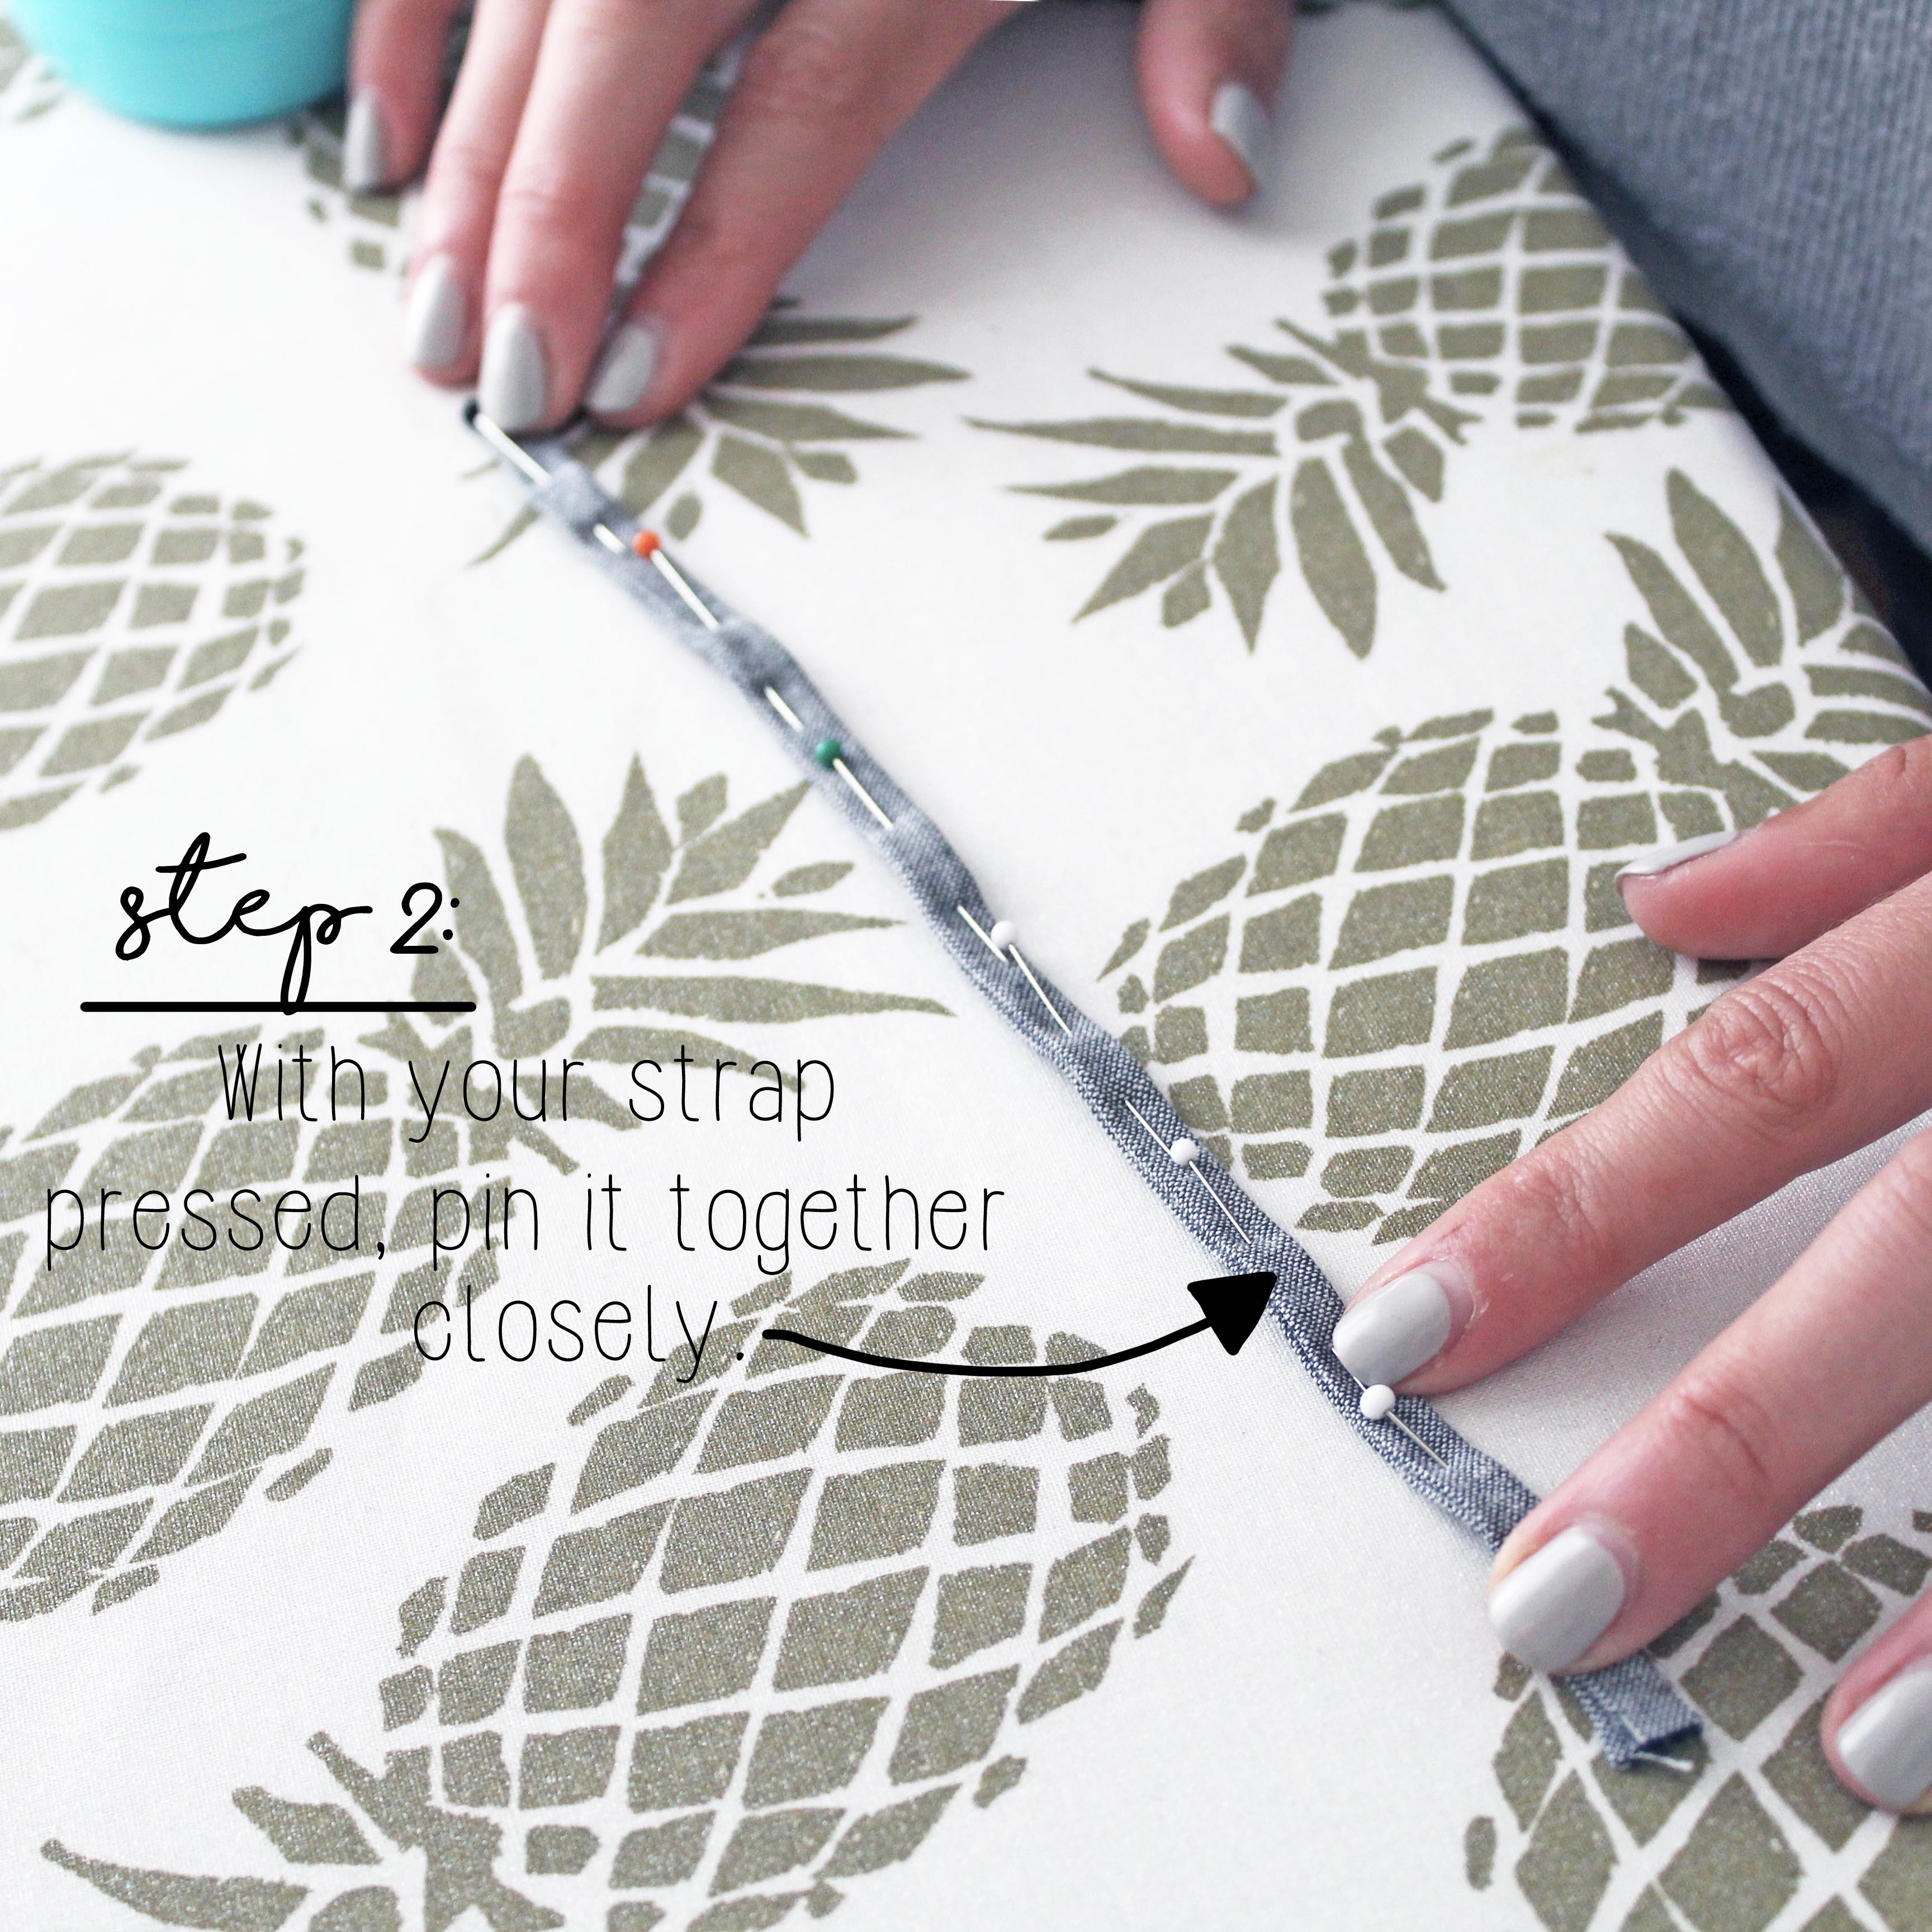
How to sew spaghetti straps sewing tutorial: Step 2 (method 1)
Next, pin and stitch your strap together.
If needed, mark your seam allowance lightly with a pencil. (Always helpful, and always recommended!) Try to keep your stitching as straight as possible, since any uneven stitching will show pretty obviously on the finished strap.

(Ready to learn how to sew spaghetti straps? Grab your free, printable worksheet tutorial below. The perfect sewing companion!)
How to sew spaghetti straps sewing tutorial: Step 3 (method 1)
Now it's time to trim the seam allowance of your strap.
Since I used a 1/4″ seam allowance, I then trimmed the seam allowance down to 1/8″. This essentially just helps to reduce bulk when turning the strap out in the next step.

You may be asking: Why use a 1/4" seam allowance, if you're just going to trim it down to 1/8"? Well, I find it much, much easier to sew a 1/4" seam allowance, rather than a 1/8" seam allowance.
I already struggle with keeping my seam allowances even, so I really don't want to make things harder than they need to be.
How to sew spaghetti straps sewing tutorial: Step 4 (method 1)
Now it's time to use that pesky goddamn loop turner. I hate this thing so much, it's not even funny.
With the spaghetti strap still inside out, insert the loop turner. Latch the little hook on the end of the strap, and essentially shimmy the strap inside out. Theoretically, the hook is supposed to stay fastened to the end of the strap while you turn it inside out.. But that doesn't happen for me, 9 times out of 10.
We are aiming for that 10th time, where the hook stays latched on to the fabric once it's turned fully right side out.


That's the hardest part, really.
Press the strap once you have it turned inside out, and you have a spaghetti strap!
(Ready to learn how to sew spaghetti straps? Grab your free, printable worksheet tutorial below. The perfect sewing companion!)
The Naoko Tank sewing tutorial: Method 2
The second method that I am going to show you on how to sew spaghetti straps is a bit easier than the first. But while it is easier, it may not look as clean.

Always a give and take, am I right? Whereas the first method's finished strap is clean and devoid of topstitching, this second method is all about topstitching.
No loop turner is needed for this method (HELL YES) but I would caution that careful precision definitely IS needed. If you aren't great with topstitching (raises hand slowly) then it may be best to stick with method 1.
But the choice is yours, you do you.
How to sew spaghetti straps sewing tutorial: Step 1 (method 2)
As mentioned above, to start this sewing tutorial you should already have your spaghetti strap cut out and ready to go.
To start, press the seam allowances in to the strap. The strap itself will be wrong side to wrong side, while the folded seam allowances will be right side to right side. Make sense?


Make sure to press evenly and carefully, so that no excess is showing on either side of the strap.
How to sew spaghetti straps sewing tutorial: Step 2 (method 2)
Once you have pressed your strap, I would pin it together as well.
Pin closely, this will help when you are topstitching the strap in the next step.
(Ready to learn how to sew spaghetti straps? Grab your free, printable worksheet tutorial below. The perfect sewing companion!)
How to sew spaghetti straps sewing tutorial: Step 3 (method 2)
Once your strap is pinned, stitch it together along the edge with the folded seam allowances. This is essentially how your strap is going to stay in one piece.
Make sure to stitch evenly and straight, so that your stitches are parallel to the edge of the strap. I would also stitch closely to the edge, no further than 1/8" away from the fold.

It is imperative to stitch straight, since the topstitching will be very obvious on the straps.
How to sew spaghetti straps sewing tutorial: Step 4 (method 2)
Once your strap has been topstitched closed, press it one more time. And with that, you have a finished spaghetti strap, my friend!
While this method may be easier overall (stupid ass loop turner) it is so so important to try and get your topstitching as straight as possible.
Maybe you find loop turners to be incredibly easy to use (like my husband) but topstitching is a bit difficult for you to get right. If that's the case, then method 1 might be easier for you. It really just depends!

(Ready to learn how to sew spaghetti straps? Grab your free, printable worksheet tutorial below. The perfect sewing companion!)
How to sew spaghetti straps sewing tutorial: Step 5 (Both methods)
Now that you have your finished strap, it's time to attach it to the garment.
If your garment has a lining, you could sandwich the strap in between the self and the lining. This ensures that the strap is extra secure, and it always an excellent option to use.

But if your garment does NOT have a lining (like the Naoko Tank) then you have a few options:
- Fold the raw edges of the straps inside the spaghetti strap, press, and hand stitch closed. (Don't know how to hand stitch? We've got you covered with this hand stitching tutorial.) Place the closed strap about 1/2"-1" down from the neckline, and hand stitch to the garment. This closure is ideal if you don't want ANY type of topstitching on your garment. But you HAVE to make sure that your stitches are strong & secure, otherwise they will come undone pretty easily. And no one wants a broken strap!
- Fold the raw edges of the straps TWICE (basically a rolled hem) and topstitch closed with your sewing machine. This method is easier than the hand stitching method, but you do have that topstitching showing. (It will also be a bit bulkier, with that folded edge.) As with above, place the finished strap about 1/2"-1" down from the neckline, and topstitch it to the garment, along the strap. Having this topstitching showing isn't ideal for everyone, but it's definitely easier, and always an option.


You could also do a combination of the two to finish off your straps.
Think: A strap with the edges machine stitched closed, but hand stitched to the garment. Or vice versa. The choice really is up to you, and just depends on the look of your overall design.
(Ready to learn how to sew spaghetti straps? Grab your free, printable worksheet tutorial below. The perfect sewing companion!)
The Naoko Tank sewing tutorial: Are you ready?

And with that, you should have some perfect spaghetti straps for your next sewing project! Not too bad, am I right? (Except for that stupid loop turner. I will always hate that thing.)
Spaghetti straps really aren't too difficult to create, and they can be used for such a wide variety of designs. I chose not to use strap adjusters for this particular project (that's a whole other sewing tutorial) but you can also add those little buggers to any strap you may make using this tutorial. The sewing is still the same, adding in the adjusters will just add a few extra steps once your straps are put together.
So. Ready to start making some spaghetti straps, and prep for Summer? Would LOVE to see any projects that you may be working on, the spaghetti strap is my most favorite strap!


![]()
![]()
![]()


