How To Organize My Sewing Space: DIY Thread Box


And yet again.. One more post this month on organizing my sewing space. But rather than talking about my DIY sewing table, this week I am showing you my brand new DIY thread box.
This little box is a work of beauty, and has truly saved me SO. MUCH. headache (already!) when it comes to organizing my thread. Because as any seamstress knows.. Organizing thread is a problem. A problem that can add up to irritation and headaches. Seriously, I'm not being dramatic.
More often than not, not every sewing project that you create is going to be the same color. Am I right? Which means that you will need thread of all different colors. Which brings me to the question:

You could start out with storing your thread in whatever you may be using as a sewing box. But you WILL come to a point when you acquire thread all colors of the rainbow, and it will no longer fit inside said sewing box. So, what to do?
For the last 5 or 6 years I have been storing my thread in a small bag that I somehow acquired while I was at FIDM. Which is a terrible idea. I do not recommend it.
(Not sure where to start when it comes to sewing? Building your own sewing kit is an excellent place to begin. Grab your complete beginner's guide below!) 


Storing thread in a bag will work in a pinch, but as you can see.. The thread gets tangled up. It doesn't matter if the thread spool has a tiny little lip to keep the thread's raw edge closed off. IT ALWAYS COMES UNDONE.
No idea how, it just does. And you wind up with an insanely tangled mess. And if you're anything like me.. You cannot function with a mess.
I literally have to clean my entire house before I can start working each day, otherwise I can't focus. And if I don't, then I will probably be a little irritated the entire day.

And isn't a great start to a sewing project.
ALSO. Having such a mess makes me just want to avoid the bag at all costs.. So sometimes I don't even check for thread before I go to the fabric store.
Which means I end up with double, or even triple, spools of thread of the same color. Not cool. In comes the DIY thread box.

When I originally decided to make a DIY thread box, I envisioned using tiny little rods to hold all of the different spools of thread.
But, as my husband pointed out, that would require a deep box. Which I just couldn't have.
(Not sure where to start when it comes to sewing? Building your own sewing kit is an excellent place to begin. Grab your complete beginner's guide below!)  If you'll recall, in our DIY sewing table post, I mentioned how we live in a tiny 400 square foot home. I don't have a lot of space, let alone space for a giant DIY thread box.
So I needed to make a box that was fairly thin. Requirement #1.
Yet, at the same time, I needed a box that would store a decent amount of thread. Requirement #2.
The thread also needed to be easily accessible, so that I could just look at the box and know if I had a certain color. And if so, how much of said color. Requirement #3.
OH. And the thread spools needed to NOT tangle up with one another. Absolute necessity. Requirement #4.
And of course, I wanted to be able to paint and decorate the DIY thread box, to make it my own. Requirement #5.
When I told my husband my plan to make this box, he looked at me like I was crazy.

And when I brought up to him that I wanted him to actually MAKE the box itself, he went off on a tangent about how difficult it is to make a box.
And how that's one of the final projects they would always do in his woodworking classes: How to make a simple box. Because it was so incredibly difficult, apparently.
(Not sure where to start when it comes to sewing? Building your own sewing kit is an excellent place to begin. Grab your complete beginner's guide below!)
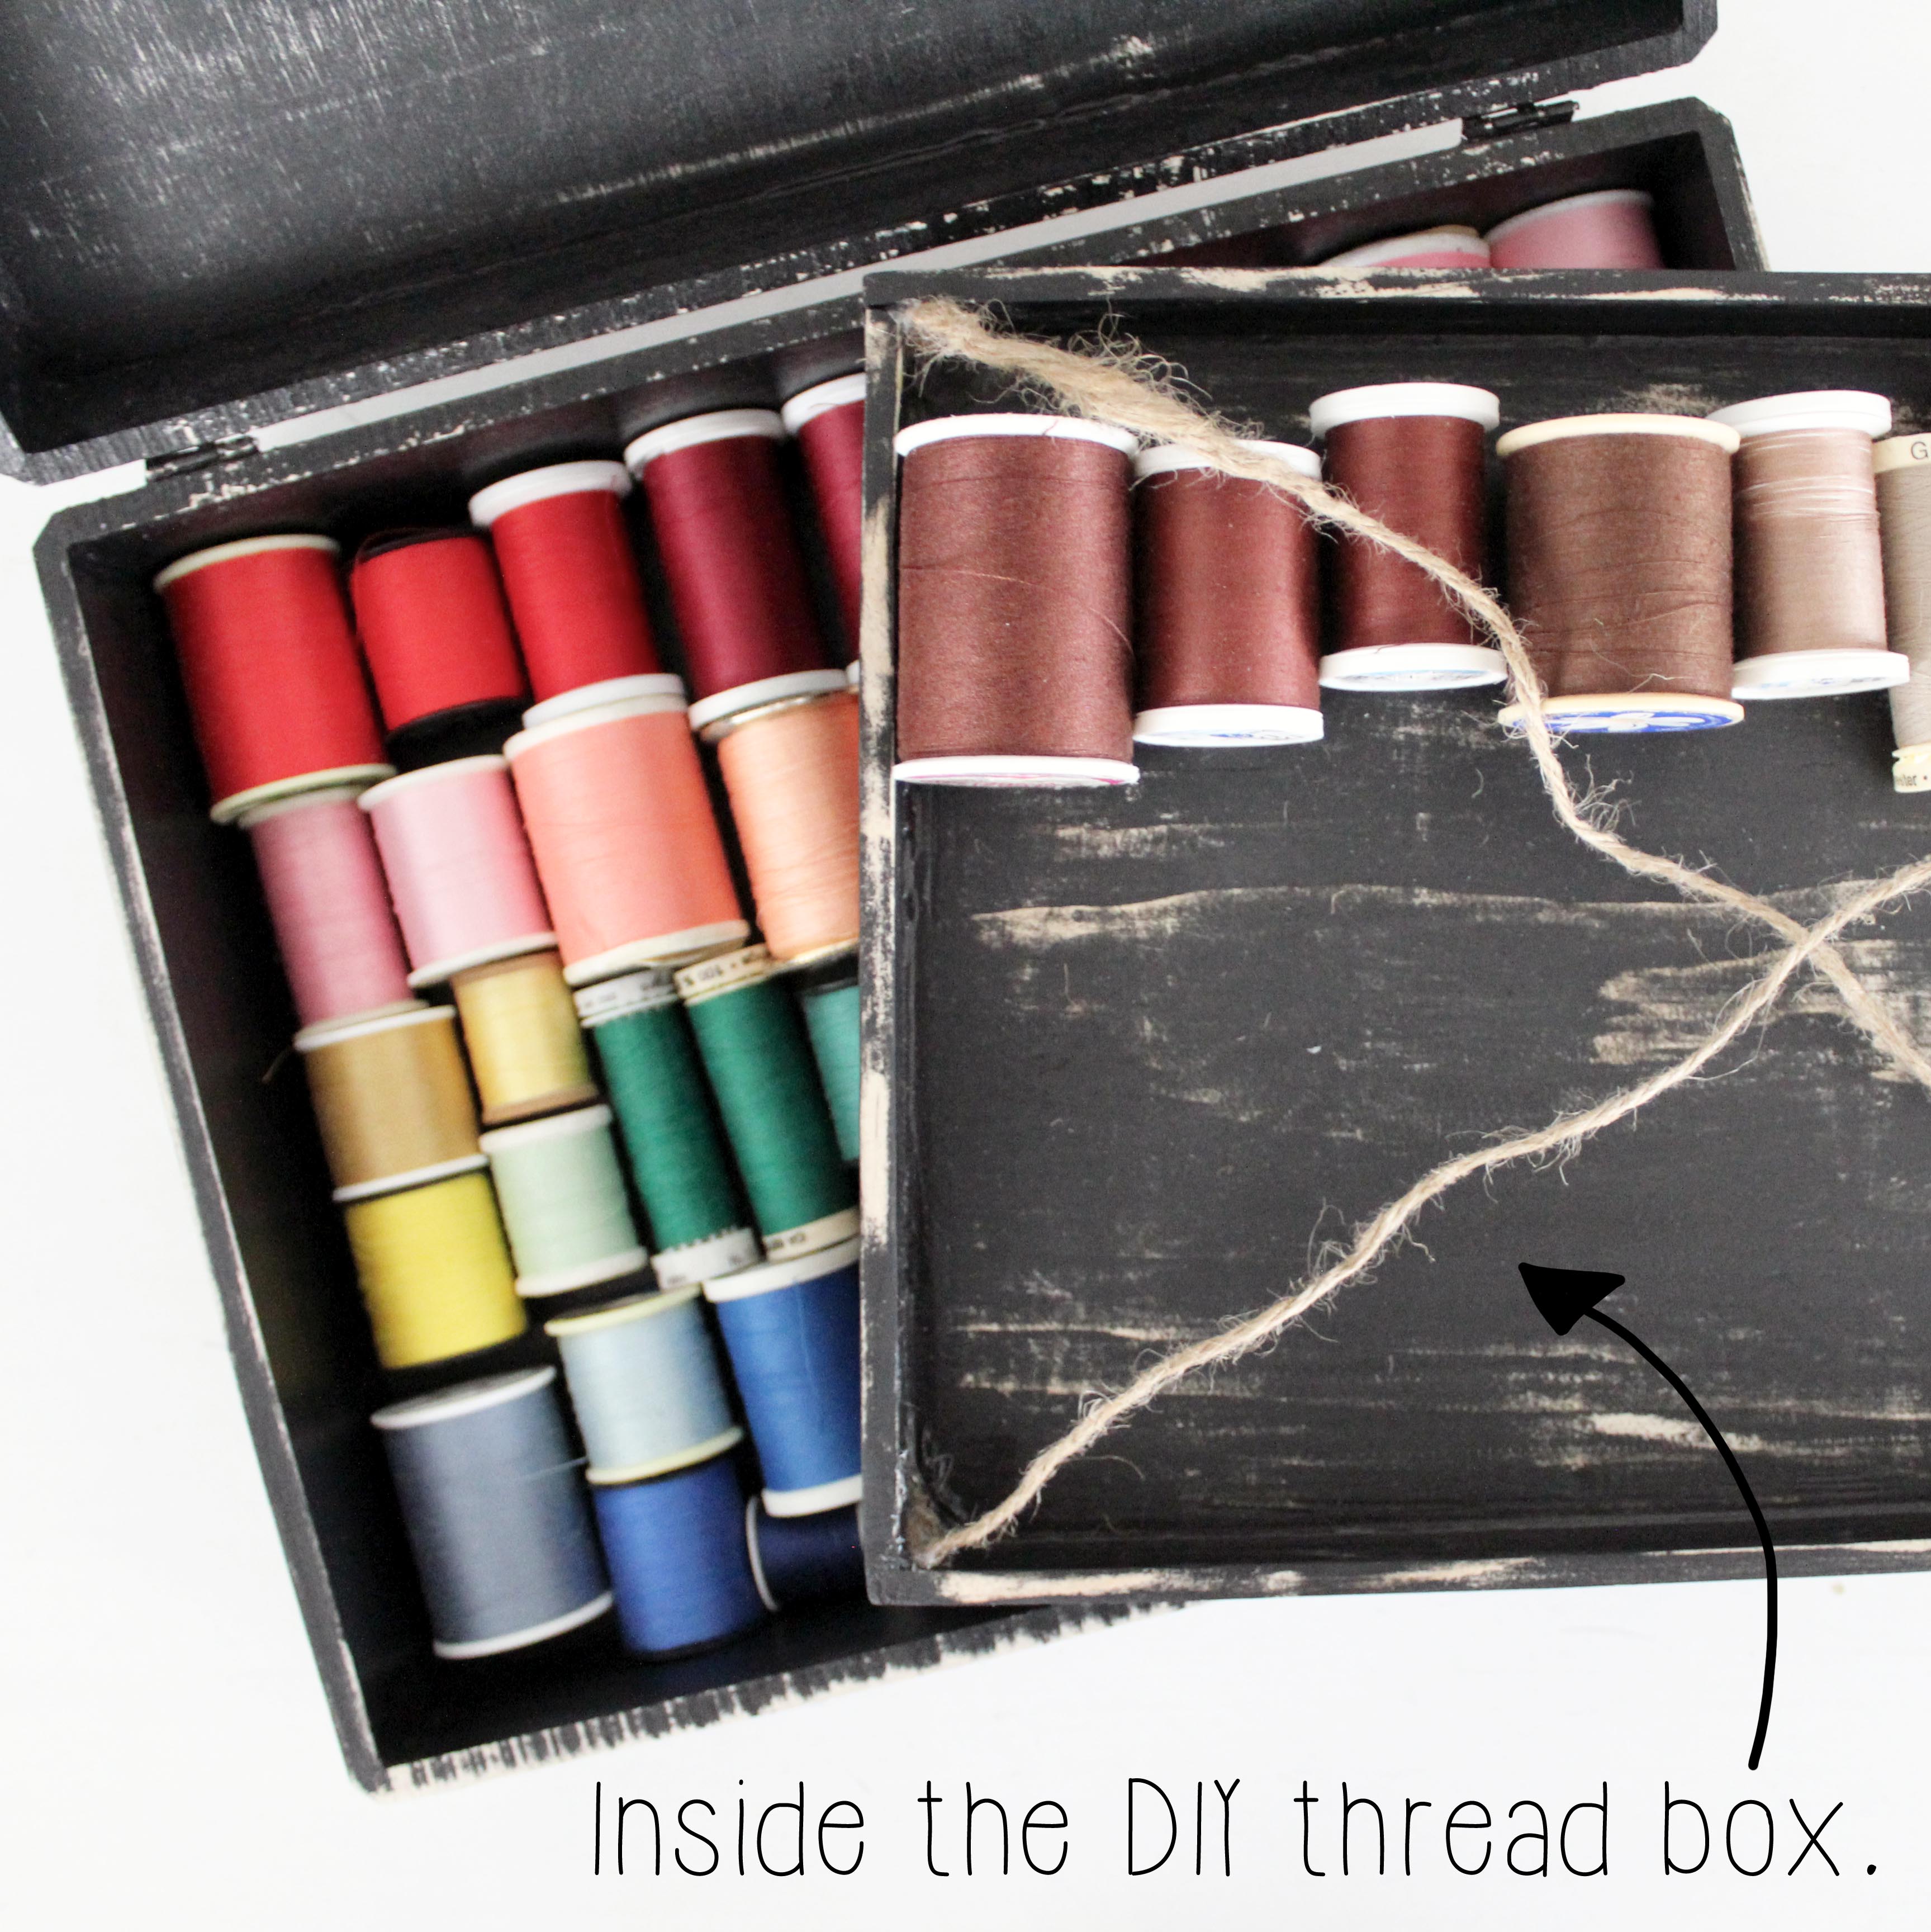
So we went off to Michael's together, and he helped me pick out everything that I needed to get this DIY thread box started. I ended up buying a good size, ready made box. It's tall enough to fit two levels of thread spools, and wide enough to fit four rows.
Exactly what I needed: Not too big, not too small.
We also bought a few pieces of wood to make the shelf, as well as some smaller pieces of wood to create the shelf siding. I grabbed some cute little lettering for the top of the box, as well as some paint and a paintbrush.


(My husband also grabbed some woodworking hand tools, which we ended up not using. If you are looking to make your own DIY thread box, but don't have power tools, then these COULD be used. It would just take goddamn forever. I started to use them and then gave up because of how long it was taking to cut a single piece of wood.)
But anyways.. That's all we needed for this project! (About $40 total for everything.) A complete shopping list is below:
- The actual ready made box.
- 2 Pieces of wider wood. (For the shelf inside the box.)
- 2 Package of thinner wood. (For the siding of the shelf, each package comes with 2 pieces of wood.)
- Lettering for the top of the box.
- 2 Small containers of black paint.
- 1 Small paintbrush.
- OPTIONAL: Woodworking tools.
(Not sure where to start when it comes to sewing? Building your own sewing kit is an excellent place to begin. Grab your complete beginner's guide below!) 

The first thing that I did when starting my DIY thread box was to paint all of the wood pieces. (My husband says never to do this, to always cut and sand everything first. But I was impatient.)
So I painted everything first, and then he cut the pieces for the shelf to fit the box.
He also sanded all of the wood, which I didn't think was necessary, but it turned out GREAT.

I feel like my style is a bit mismatched and chic, so I think the distressed look on the box fits the look of our home perfectly.
We used a strong wood glue to attach the two pieces of the shelf together, as well as the siding of the shelf. When attaching the siding to the shelf, my husband also used clamps to hold the pieces together until the glue dried. (Just to make sure the pieces stayed together. And it worked!)
To pull the shelf up, I glued two pieces of twine along each corner of the shelf. The twine meets together in the center, which essentially just allows me to pull the entire shelf up, to get to that lower level of thread. Simple.
As a last minute addition, I decided to add a small patch of felt along the inside of the lid. When I was untangling all of the thread to put in the box, I found like 5 sewing needles that I just left on the spools. So that small patch of felt is essentially a pin cushion for sewing needles! #genius
I glued the letters on top of the box as a finishing touch, and that was it!
(Not sure where to start when it comes to sewing? Building your own sewing kit is an excellent place to begin. Grab your complete beginner's guide below!) 
The most difficult part of this project was cutting the wood pieces to fit the rest of the box. Other than that, it was just painting, sanding, and glueing. (And if you happen to have a husband (or wife) who loves woodworking, then you're golden!)
If I ever travel with this baby, I would probably look into adding a small handle that would go along the back of the box. Which would also require a latch along the front of the box. Not necessary right now, but always something to think about!

It holds all of the thread that I had banging around in my thread bag, with the exception of my giant cones of thread. (Which I'm okay keeping together separately, since I really only have a few of them.)
And I really feel like I didn't have too many requirements for this project:
- I needed a box that wasn't too big--Ideally on the thinner side, for the sake of storage.
- But I also needed a box that could store a decent amount of thread.
- All of the thread spools needed to be easily accessible, at a moment's glance.
- I needed the thread spools NOT to get tangled with one another.
- And finally, I wanted to be able to paint and decorate the box to make it my own.
(Not sure where to start when it comes to sewing? Building your own sewing kit is an excellent place to begin. Grab your complete beginner's guide below!) 
Ideally, if you wanted to have an all in one DIY thread box that would also store fabric cones, you would really only need to add another shelf. (Which would of course require a deeper box.)
Other than getting a deeper box, the steps and tools needed would be the same. And if you've got the space for a deeper, bigger box, then go for it! I just really don't.
Would you guys be interested in an actual step-by-step tutorial on how to make this DIY thread box?


![]()
![]()
![]()